 Your ePortfolio should be a work in progress at all times. The following steps will help you get started and moving in the right direction. Open your portfolio in another window and keep this page open as a reference guide while you work through the process of creating your ePortfolio on Mahara.
1. Gather
The first thing you need to do is collect all of your work and begin to upload the files to Mahara. To do this, go to the Mahara Dashboard and click![]()
Then, select Files.
From here, you can upload your work by clicking the Upload button–or by clicking and dragging the files into the box.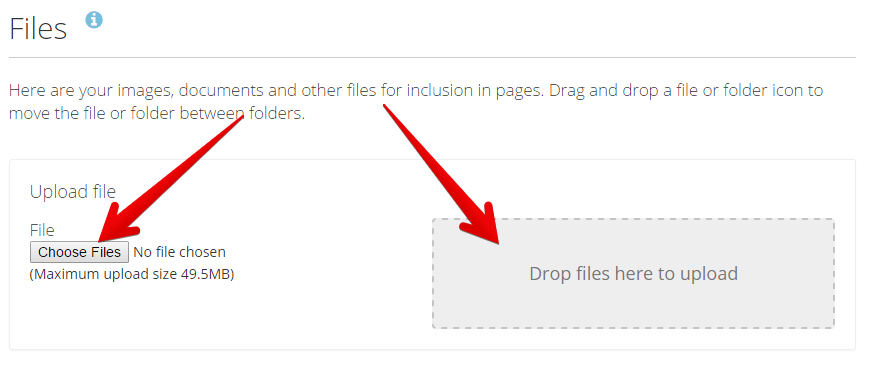
Once you have uploaded a good amount of your work, you’re ready to begin organizing and displaying your work.
2. Display
Creating a page
In order for anyone to be able to see your work, you’ll need to organize it and display it on a Page. Pages can be as broad or as focused as you want them to be. Think of a Page as a “virtual posterboard”, where you can display your work in whatever format or arrangement that you choose. For example, you may create a page for your entire 7th grade year, or you can create a page for a specific project in a specific subject–or both! To create a page, click ![]() This will display all of the pages you’ve created, so you’ll need to remember this for the future. Next, click Create page to start a new page.
This will display all of the pages you’ve created, so you’ll need to remember this for the future. Next, click Create page to start a new page.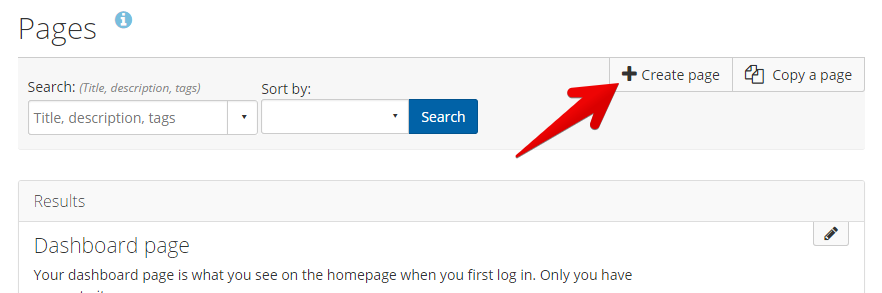
Give your page a name that describes what it will contain and a description (optional). You can change these at any time later. Click Save to create the page.
Editing your page
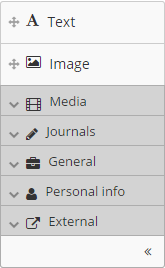
Now that you have created your page, you can add any materials or artifacts you wish. These can include images you’ve uploaded already, text, videos, links, journal entries that you’ve already written, information about yourself that you’ve already entered into your “resume”, and more. Simply click and drag an item holder from the menu at the left to the place you’d like to position the artifact on your page.
Adding any item to your page will bring up a dialog box that will help you configure the piece you’re adding to your page.
Keep in mind that no one can see your page until you Share the page. So work on your page until it looks the way you’d like it. Then it’s time to make it visible to others.
3. Share
When you decide to share your page, you have complete control. You can share it with as broad of an audience as you choose, for as much time as you wish. To share your page, make sure you’re in the page edit screen. Then click Share page.

Next, click the Share with drop-down.

This will bring up all of the available audiences with which you can share your page. Ask your teacher for help on this. STUDENTS: Sharing your page with the public opens up your page for the entire world to see. Unless you’ve talked this over with your teacher DO NOT SHARE your page with the Public.
The best audiences with which to share your page are Groups. You must be a member of a group in order to share your page with the group. Your teacher should have created a group that you can join by this point. If you are already a member, this group will appear when you click Share with.
4. Give and Receive Feedback
Once your page is shared, you will be able to receive feedback from the people with whom you’ve shared your page. If you shared it with a group, members of the group will be able to access your page and comment. You can also give feedback on pages you have the privileges to view. Ask your teacher for help with what types of feedback you should give. Remember to keep your comments appropriate. You are never anonymous when online. If you ever notice that someone has placed an inappropriate comment on your page, talk to your teacher right away. You can also click the button at the top of your page and select Report objectionable material to notify an administrator of inappropriate comments or material.
Click below for a growing playlist of short video tutorials on how to use Mahara.
As always, we value your feedback. We’d love to hear what you think below: